FAQ
A collection of frequently asked community questions.

The way to share a link for others to download after adding a file to a BTFS node.
- Adding a file produces a file hash, which is sent to the recipient. The recipient runs a BTFS node and then downloads it using this command line: btfs get file hash.
- Using a gateway service provided by the project, fill the file hash with the URL: https://gateway.btfs.io/btfs/file hash and then download the link through a browser, etc.
The reward of running multiple BTFS nodes under the same public IP.
Multiple BTFS programs can be run on the same machine, and we currently do not have a limit on the number of BTFS nodes that can be run from a single public IP.
If running multiple BTFS nodes, then each node needs to generate a new wallet?
Yes. The default and correct practice is to use a different private key for each BTFS node (one private key for one wallet and one private key for one Peer ID). The result of multiple nodes using the same private key may be that none of these nodes are consistently accessible and all of them do not have access to the storage contract.
It is not recommended that you use the same private key to run on multiple machines, either as a renter or as a host. It is not recommended if multiple machines are on the same IP, and there are security risks if they are on different IPs.
Is the bandwidth unstable and considered to be offline?
- BTFS nodes will periodically report heartbeats and other data, if the network is unavailable during the reporting period, then the online time score will drop, resulting in a decrease in Host score, when the Host score is less than 8 points will not get the storage contract.
- If the network is unavailable when receiving files or being checked for the complete validity of stored files, then the file storage or checking will fail, which will affect the corresponding revenue.
My BTFS node is always online and has a score of 10, but no contract; my BTFS node always had a contract before, but now it doesn't.
As long as the node exceeds 8 points it has a chance to gain revenue. Because of the large base of Hosts that meet the conditions, the probability of a Host getting a contract is uncertain, and later on, as the BTFS community expands and uses increase, etc., the number of contracts will increase accordingly.
Ways to report cheating.
Write the complete cheat address + reason for suspicion and send it to the official designated email address [email protected]. The team will carefully verify and block the airdrop reward processing for the confirmed cheating addresses, and blacklist the cheating addresses permanently so that they cannot continue to participate in mining activities.
Solutions to common errors init settlement err: init vault service: vault init: not a valid factory contract
init settlement err: init vault service: vault init: not a valid factory contractI,The correct way to upgrade.
- Make sure the current version is version 1.6.0 (or other 1.x versions)
- Refer to the official documentation to upgrade (https://docs.btfs.io/docs/tutorials-on-upgrading-btfs-v10-to-btfs-v20-mainnet) (Copy this link to open in your browser)
II,The wrong way to upgrade.
If you upgraded btfs-2.x version before, and now upgrade btfs-2.1.0, you will get an error init settlement err: init vault service: vault init: not a valid factory contract, at this time you need to save the private key and file data first, and then upgrade 2.1. 0 version upgrade.
The solution is as follows.
- Enter the current BTFS-PATH directory (usually under ~/.btfs) and backup config and blocks (note that the private key is in config and the previously uploaded data is in the blocks folder)
- Download btfs-2.1.0 for upgrade, refer to the official documentation, and note that after
btfs init, replace the backup config and blocks with the existing ones, and thenbtfs daemonrefer to the official documentation, so that it can be processed.
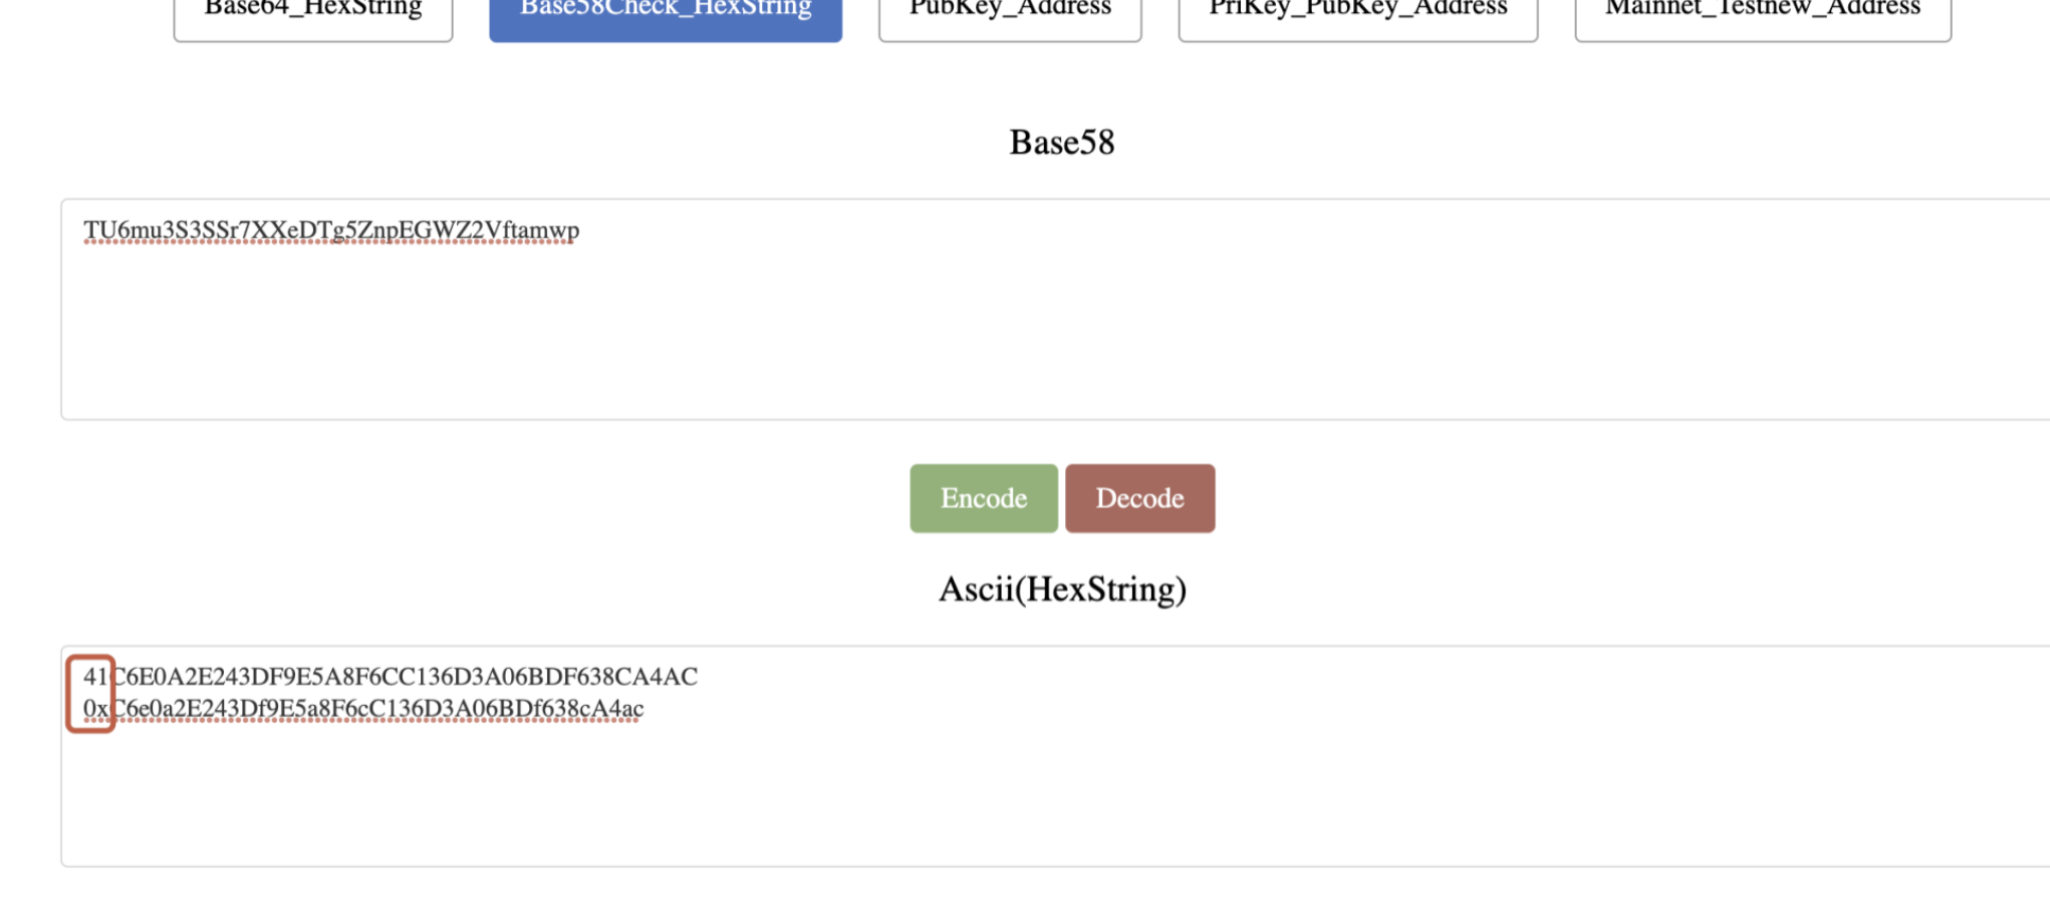
The way to convert TRON's address to BTTC's address.
https://tronscan.org/#/tools/tron-convert-tool Just replace the 41 at the beginning with 0x

Why is the node the latest version, but there is no version score?
It is recommended to check if there is the same node running on multiple machines, which can occur when multiple machines are running a node at the same time and with inconsistent versions.
Solution for "No online proofs have been submitted since the node was upgraded to V2.2.0"
The BTFS community has identified the following possible causes for the reported issue "the node has not submitted online proof after the v2.2.0 update". Solutions are provided below.
Cause 1: "OnlineServerDomain" is added to the config file of v2.2.0 nodes. If you start your node without updating the configuration, the node may not be able to submit online proof because OnlineServerDomain cannot be found in the config file.
Solution:
- Open the config file of your node and check whether there is "OnlineServerDomain" in the config group "Services";
"OnlineServerDomain": "https://online.btfs.io/",

- If this configuration is null or does not exist, add it to the group as shown above, init again, and start the node.
Cause 2: The node fails to connect to the signature service.
Solution: Test the connectivity of the node and the signature service's domain name (https://online.btfs.io).
Cause 3: The node has unstable network connection.
Solution: We recommend you check the network status of the node.
Error: init vault service: vault init: insufficient funds for gas * price + value
Error: init vault service: vault init: insufficient funds for gas * price + value
What causes this error: BTT deficiency
Solution: Recharge BTT
Error: report status contract: reportstatus/reportstatus. go: 258
What causes this error: Usually, the error will disappear after some time. This error may be caused by a previous migration of data, so you do not need to worry about it.
Solution: No additional user actions required.
Error: report-status-contract: reportstatus/reportstatus. go: 252 GetReport Status err:storage:not found
What causes this error: This error is generated when the node reports status for the first time because the local data is empty. The error will disappear after the number of reports >= 2.
Solution: This error can be ignored and does not need to be handled.
ERROR report-status-contract: reportstatus/reportstatus.go: 258 ReportStatus err:execution reverted: reportStatus: Invalid lastNonce<Nonce
If this error is reported, it is currently recommended to restart a new node and import the private key.
init settlement err: init vault service: vault init: contract deployment failed: transaction reverted
Timing of the error: This is the error message generated when the contract is deployed.
Solution1: It is recommended to check if the balance is sufficient. If the balance is low, it is recommended to top up.
Solution2: Suggest to redeploy.
Error: lock /home/ubuntu/.btfs/repo.lock: someone else has the lock
What causes this error: there is already one daemon process running in background
Solution: kill it first and run btfs daemon again.
If the user has the need to start multiple nodes on the same machine, the configuration needs to be modified.
Windows client update solution
How to update BTFS v1.x.x to the latest version (applicable to BTFS installed from BitTorrent clients):
- Make sure both your BitTorrent client and the BTFS installed from it are up and running;
- Download the script at https://raw.githubusercontent.com/bittorrent/go-btfs/master/scripts/bt_btfs_upgrade.bat and double click the file to run the program;
- After the script is executed, you will be redirected to the onboarding page of BTFS 2.0 once the update is completed;
- Follow the instructions on the page to make a deposit, and wait for the contract to be deployed and the service to be enabled;
- Once the service is on, you will be taken from the onboarding page to the BTFS dashboard.
Notes:
- The .BAT file will not work when your BitTorrent client is not running (check if there is a BT icon on the taskbar). Please try again if the script fails.
- Try to copy the URL (http://127.0.0.1:5001/hostui) to another browser when the onboarding page does not show in your default Internet Explorer browser.
- If you close the BT client without making a deposit after the update, the client's entry to BTFS will not show next time when you start it. This is because BTFS is still running. To solve this issue, please end the BTFS task in the task manager and restart the BT client.
Tutorials on Upgrading BTFS v1.0 to BTFS v2.0 Mainnet
Export the version 1.0 private key, which is used to transfer the assets out of the 1.0 node,
Please refer to “Get Private Key in Hex Format” in the document below.
https://docs.btfs.io/v1.0/docs/withdraw-btt-from-btfs (Copy this link to browser to open)
Step 1: Download and launch BTFS v2.1.0 release
- Download the BTFS v2.1.0 release, please refer to https://github.com/bittorrent/go-btfs/releases to choose the corresponding system and architecture.
- Rename the downloaded file(unzip it first if it is a compressed file) as “btfs”. Replace the btfs file in version 1.0.
- Run BTFS daemon via the following command line(199 is the corresponding chain ID of BTTC, make sure using the new btfs file),
$ ./btfs daemon --chain-id 199
Initializing daemon...
go-btfs version: 2.1.0
Repo version: 10
System version: amd64/darwin
Golang version: go1.16.5
Repo location: /Users/btfs/.btfs
Peer identity: 16Uiu2HAmKFQPM72SssFRrqcH1qwUsPwcp7vXSg3SEzfdYua1J5qc
the address of Bttc format is:  0x7Cf4B71017F0312037D53fe966CE625BF98FFff6
the address of Tron format is:  TMMuwwxsuQGrDrN3aanc5y5r4FbibgLYDa
cannot continue until there is sufficient (100 Suggested) BTT (for Gas) available on 0x7cf4b71017f0312037d53fe966ce625bf98ffff6
Step 2: Recharge enough BTT to the BTTC address output in the boot log, suggests a minimum of 100 BTT, which is used as gas to deploy a node vault contract by the node account.
How to configure the recommended number of network connections in BTFS v2.3.1, and what are the recommended configuration values?
To configure the recommended number of network connections in BTFS v2.3.1, follow these two steps:
Step 1: Execute the commands below:
- For ConnMgr:
btfs config Swarm.ConnMgr --json '{"LowWater":10, "HighWater":900, "GracePeriod":"10s", "Type":"basic"}'- For ResourceMgr:
btfs config Swarm.ResourceMgr.Limits.System --json '{"StreamsInbound": 96000, "ConnsInbound":6000}'Step 2: Restart the node. For reference, visit: https://docs.btfs.io/docs/install-run-btfs20-node
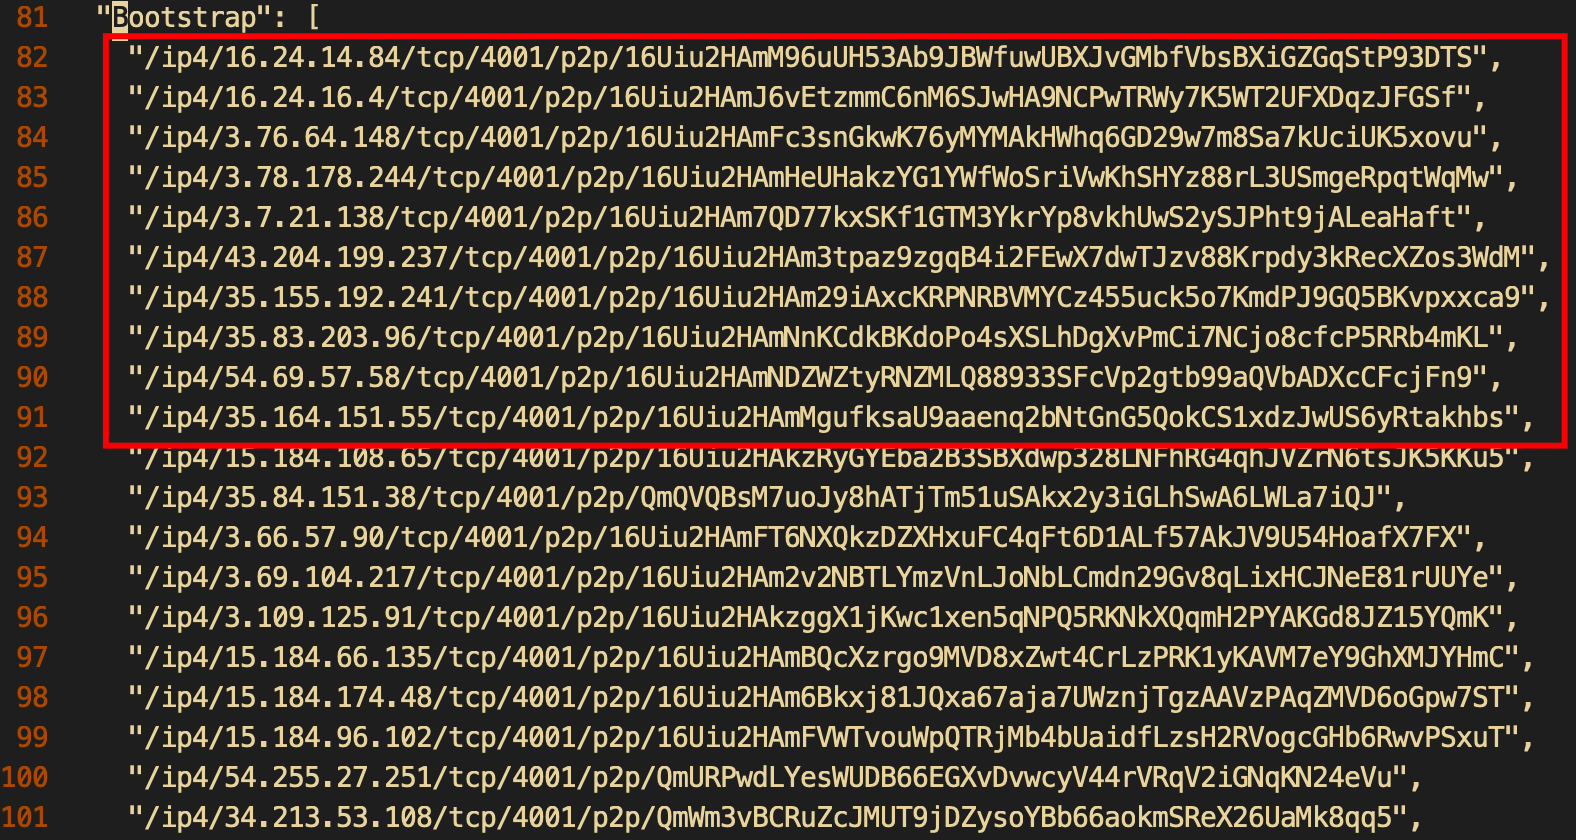
What are the new bootstraps, and how do I add them to my node?
The newly added bootstraps are:
/ip4/16.24.14.84/tcp/4001/p2p/16Uiu2HAmM96uUH53Ab9JBWfuwUBXJvGMbfVbsBXiGZGqStP93DTS
/ip4/16.24.16.4/tcp/4001/p2p/16Uiu2HAmJ6vEtzmmC6nM6SJwHA9NCPwTRWy7K5WT2UFXDqzJFGSf
/ip4/3.76.64.148/tcp/4001/p2p/16Uiu2HAmFc3snGkwK76yMYMAkHWhq6GD29w7m8Sa7kUciUK5xovu
/ip4/3.78.178.244/tcp/4001/p2p/16Uiu2HAmHeUHakzYG1YWfWoSriVwKhSHYz88rL3USmgeRpqtWqMw
/ip4/3.7.21.138/tcp/4001/p2p/16Uiu2HAm7QD77kxSKf1GTM3YkrYp8vkhUwS2ySJPht9jALeaHaft
/ip4/43.204.199.237/tcp/4001/p2p/16Uiu2HAm3tpaz9zgqB4i2FEwX7dwTJzv88Krpdy3kRecXZos3WdM
/ip4/35.155.192.241/tcp/4001/p2p/16Uiu2HAm29iAxcKRPNRBVMYCz455uck5o7KmdPJ9GQ5BKvpxxca9
/ip4/35.83.203.96/tcp/4001/p2p/16Uiu2HAmNnKCdkBKdoPo4sXSLhDgXvPmCi7NCjo8cfcP5RRb4mKL
/ip4/54.69.57.58/tcp/4001/p2p/16Uiu2HAmNDZWZtyRNZMLQ88933SFcVp2gtb99aQVbADXcCFcjFn9
/ip4/35.164.151.55/tcp/4001/p2p/16Uiu2HAmMgufksaU9aaenq2bNtGnG5QokCS1xdzJwUS6yRtakhbs
If you install a new node, the added bootstraps will be automatically written into your config file. To add them to your existing node, you have two options:
- Use an editor like vi to add the bootstrap lines to your ./btfs/config file. Here's an example:

- Use the command line to add them line by line. Here's an example command:
btfs bootstrap add /ip4/16.24.14.84/tcp/4001/p2p/16Uiu2HAmM96uUH53Ab9JBWfuwUBXJvGMbfVbsBXiGZGqStP93DTSAfter making the changes, restart your node for the changes to take effect.
Updated 8 months ago
